I recently built a Raspberry Pi-powered hedgehog camera to view hedgehogs and other wildlife in my garden.
Hardware
Raspberry Pi
I actually tried a Pi 1 model A+ and a Pi 3 model B, and found no great difference in performance in this role, so I stuck with the A+ since it consumes less power and is smaller. You should be able to use any model which has the camera connector (all except the original Pi Zero).
Camera
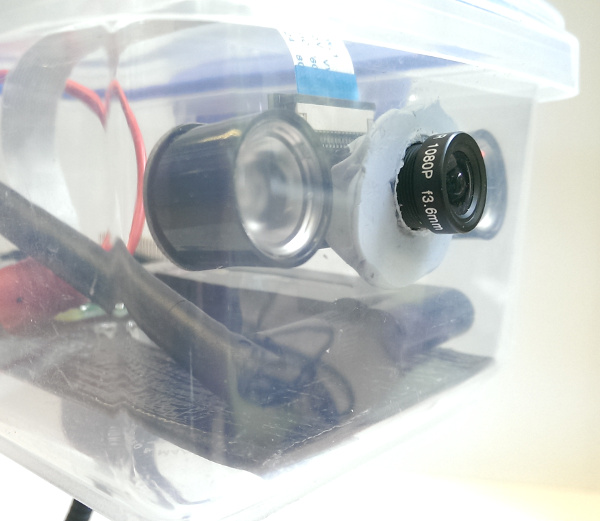
I used a Raspberry Pi night vision camera – a 5MP infra-red camera module with IR LEDs – perfect for taking pictures at night, and also works well during the day.
WiFi dongle
I used a Long-range WiFi dongle with antenna – this allows the device to get a WiFi signal at the end of my garden so I can connect in.
Housing
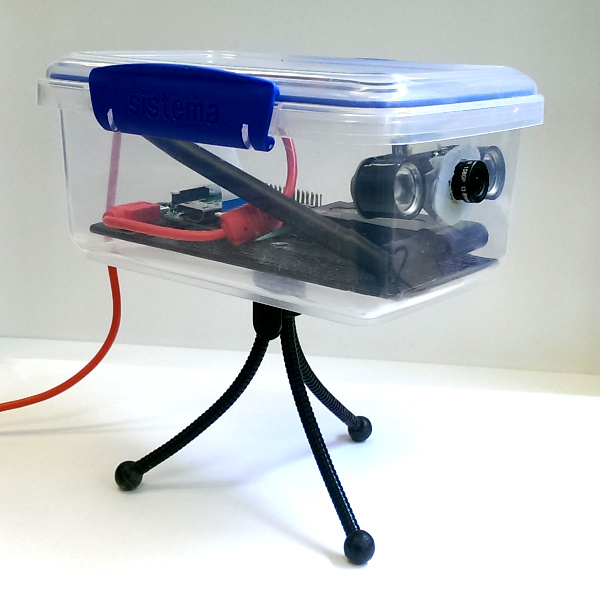
After looking at various (very expensive) waterproof boxes, I opted for one from the supermarket – the kind used to store food. The ones with the rubber seal are very waterproof and should protect the electronics against adverse weather conditions.
I drilled a hole at the front of the box to allow the camera lens to fit through (although I left the LEDs inside). I placed blu-tack around the hole on the inside to prevent water ingress.
I also made an adapter which allows the box to be mounted on a tripod, although this probably isn’t really necessary since it is fairly easy to position the box without this. I made this with a sheet of aluminium that fit into the bottom of the box, onto which I glued (using epoxy) a nut with the appropriate thread for a standard tripod (1/4-20 UNC). I drilled a hole in the aluminium sheet under the nut, and in the bottom of the box to allow the tripod thread to enter.
Power
I had originally intended to power the device using a large rechargeable power pack I had (10400mAh). This was able to power the Pi A+ and the WiFi dongle just fine for over a day. However, I found that the IR LEDs on the camera module were particularly power-hungry, and the battery would only last around 4-5 hours with those plugged in. I therefore decided to allow the device to be powered from the mains if required, so I made a small hole in the lip of the box near the plastic seal, to allow a USB cable to enter. I then ran this to a mains adapter placed in an appropriate water-resistant location.
Software
I started off by installing Raspbian on a 8GB MicroSD card, and enabled the camera from raspi-config.
pi-timolo
I installed pi-timolo – which stands for Pi Time lapse, Motion detect, Low light. This is an excellent and very configurable program which allows you to take pictures automatically when motion is detected, and/or at regular intervals.
VNC Server
I found the RealVNC Server for Raspberry Pi to be very useful in setting up the system, since it comes pre-installed with Raspbian, and allows you to connect in and view the live camera image (by running the raspivid command). This allowed me to connect to the device in-situ from a tablet and focus the camera (by turning the lens on the front). This is shown in the following screenshot, which is actually taken on my desktop machine running VNC Viewer:
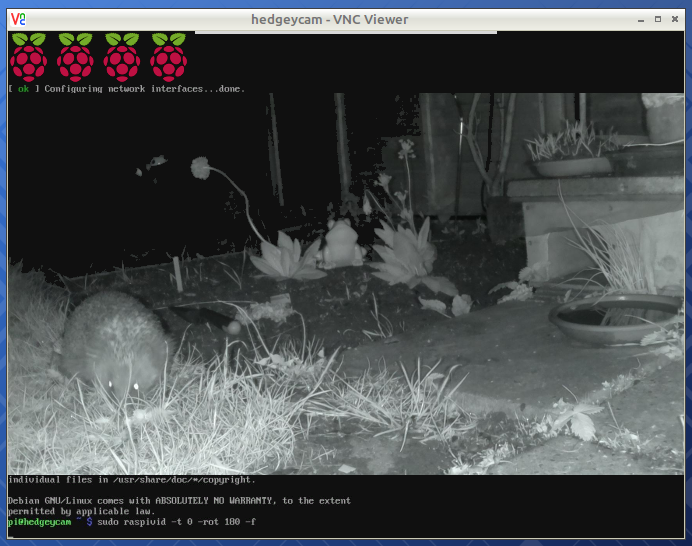
Here I’m using the raspivid command to show a live preview from the camera:
$ sudo raspivid -t 0 -rot 180 -fn
Run “raspivid –help” for a full list of the available options here. The “-t 0” option means to show the preview indefinitely, so use Ctrl-c to stop it when done. Only one application can access the camera at one time, so you must stop raspivid before running pi-timolo, and vice-versa. Note that I used “-rot 180” to rotate the image since I actually mounted the camera upside down due to the cable orientation! Pi-timolo has a similar option (flip horizontal and vertical) to achieve this.
ffmpeg
I found ffmpeg very useful for converting series of timelapse or motion-detection images into a single video file. An example command to do this is:
$ ffmpeg -f image2 -pattern_type glob -i '*.jpg' out.mp4n
Use it
I placed the device in a suitable position at the end of my garden, where I had seen hedgehogs in the past. I then powered up the device and made sure the camera was focussed. I also put down some hedgehog food and a dish of water to try and draw in any wandering hedgehogs. I then stated pi-timolo and left it to run overnight!
Results
The following video shows the result of my first attempt at filming hedgehogs:
n
Please visit the excellent Hedgehog Street website for more information about hedgehogs in the UK and how you can help to support them in your garden.