A quick hack to make a night light which can display a spectacular rainbow light show using a Raspberry Pi Zero W. Ideal for children who aren’t quite sure when it’s time to wake up!

Components used:
- A round “push light” unit – like this one. Anything similar that would fit a Pi Zero will do.
- Raspberry Pi Zero W plus GPIO header (or you can now get the WH version which has the header pre-soldered).
- Blinkt – a strip of 8 RGB LEDs which attaches to the Pi’s GPIO header.
- USB power supply/phone charger capable of powering the Pi and LEDs.
- Blu-tack – most important.
Construction
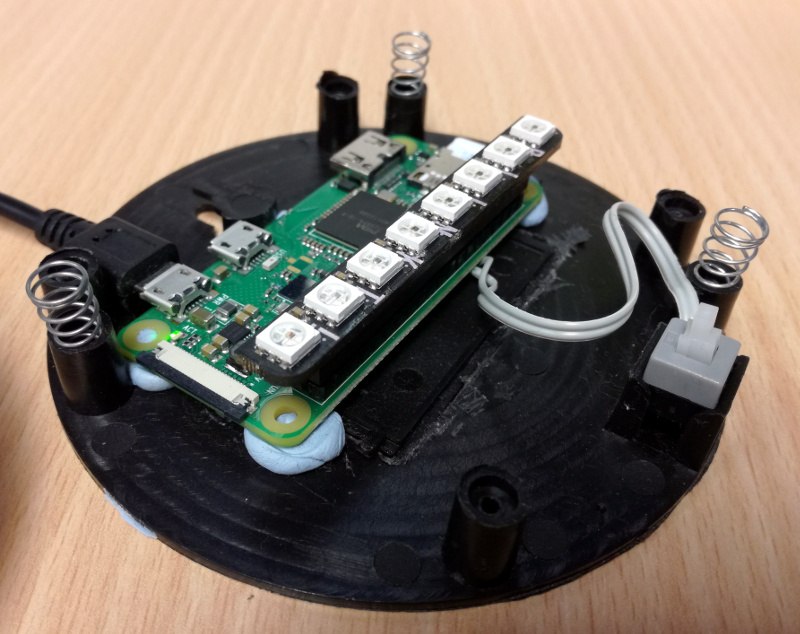
I took the push light unit apart using the screws on the underside, and removed all of the innards. I also cut off the battery compartment that projected into the unit (since that was not required) in order to make enough room, and taped the battery door shut. I left the switch in place, which used to switch the light on and off when the top of the unit is pushed down.
I soldered the GPIO header onto the Pi Zero W and mounted the Blinkt unit onto it. I also soldered the wires from the existing switch to pins 12 (BCM 18) and 14 (Ground), which are not used by the Blinkt according to pinout.xyz.
I then mounted the Pi on the base of the unit using blu-tack on each corner, aiming to get the Blinkt roughly in the centre. In order to plug in the power supply, I cut a rectangular section from the plastic side piece of the unit in the appropriate place.

Software
I prepared a Micro SD card with the latest Raspbian Stretch light image.
I booted from the SD card using another Raspberry Pi and entered the required settings to connect to my WiFi network in /etc/wpa_supplicant/wpa_supplicant.conf. Alternatively, you could temporarily plug a monitor and keyboard into the Pi Zero itself to do this. I also enabled SSH and changed the hostname from the default “raspberrypi” (using the raspi-config program) so I could identify it easily when it connected to my network.
I then inserted the Micro SD card into the Pi Zero before putting the unit back together, plugging in the power and switching it on. After the Pi has booted, you should be able to find the Pi on your network (I use my WiFi router’s admin interface which lists connected devices and IP addresses), and connect to it using SSH (username “pi” and password “raspberry” by default – but I’d recommend you change this).
I followed the instructions on the Pimoroni website to install the Python library required to control the Blinkt.
I wrote a Python script to control the light, which is launched automatically via /etc/rc.local when the Pi boots. This uses the RPi.GPIO library to respond to the user pressing the button, which enables and disables the light. It activates the internal pull-up on GPIO pin 18, since the button connects to ground. The button on this unit is actually a push-on, push-off type, so we simply detect any level change and interpret this as a button press.
When in ‘dim’ mode, the Blinkt LEDs are set to give a dim orange glow, which apparently is good for sleep. The white plastic top of the unit helps to diffuse the light. When the configured wake-up time is reached, the light turns to a very bright rainbow pattern, which transitions along the LED array.